Showing posts with label mario batali. Show all posts

Thursday, January 12, 2012

Lasagne alla Bolognese fatto in casa!

IE: Homemade lasagna! From scratch!

This is probably the best lasagna I've had in a VERY long time, and may be the best. It certainly rivals my moms lasagna which is fantastic! As a Christmas gift Josh and I received the KitchenAid mixer attachment for rolling out pasta and we thought it was time to test it out. Josh decided that he was going to make lasagne, one of the most complicated pastas to make... But it was so worth it! It was something fun for the two of us to do. I would recommend taking an afternoon with your special someone and spending some time in the kitchen on this one. It was a fun day of bonding over pasta.

A question that was raised during our afternoon of cooking: Is it worth it to make homemade noodles? Does it make that much of a difference? Well, we tested that question and decided that YES! Homemade noodles are so much better!


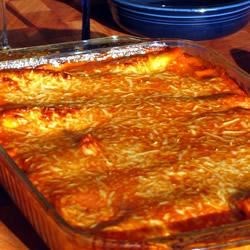
Lasagne alla Bolognese al Forno
Courtesy of Mario Batali

Prep Time: we didn't time... but it took all afternoon (probably 3-4 hours)
Baking time: 45 minutes
Yield: 2, 9x13 pans of lasagne (or 1 10x20 pan)

To assemble you will need:
-2.5 pounds green pasta dough (see Step 3)
-ragu bolognese (see Step 1)
-8 oz freshly grated Parmigiano-Reggiano
-3.5 cups besciamella (see Step 2)


Step 1: Make the Ragu Bolognese
-1/4 cup EVOO
-2 medium onions, finely chopped
-4 ribs celery, finely chopped
-2 carrots, finely chopped
-5 cloves of garlic, sliced
-1 pound ground veal
-1 pound ground pork
-4 oz. pancetta or slab bacon (grind if you have a butchers grinder), we just chopped until it resembled ground pancetta
-1 six oz. can tomato paste
-1 cup whole milk
-1 cup dry white wine (we use pinot grigio)
-1 tsp fresh thyme leaves (dried will work just as well)
-salt & freshly ground black pepper

1. In a 6-8 quart pot, heat olive oil over med heat until hot. Add onions, celery, carrots and garlic. Cook until the vegetables are translucent but not browned (about 5 minutes).

2. Add veal, pork and pancetta. Increase heat to high and brown the meat. Stir frequently.

3. Add tomato paste, milk, wine and thyme and bring just to a boil, then reduce heat to medium-low and simmer for 1-1.5 hours.

4. Season with salt and pepper to taste, remove from heat and let cool.

NOTE: the ragu can be refrigerated for up to 2 days or frozen for up to 1 month.


Step 2: Make the Besciamella (3.5 cups). Please see my Cannelloni post for the recipe. Set aside and let cool.


Step 3: Make the Pasta
(makes about 1.25 pounds)
-3.5 cups all-purpose flour, plus extra for kneading
-5 large eggs
-one cup packed spinach
- 2 tbsp EVOO

1. Bring 3 quarts of water to a boil in large pot and add 1 tbsp salt. Set up an ice back next to the stove (a large bowl with cold water and ice cubes). Blanch 1 cup packed spinach leaves in boiling water for 45 seconds, then remove with slotted spoon and immediately immerse into the ice bath for 2 minutes. Drain the spinach and squeeze it dry in a kitchen towel. Remove as much moisture as possible. Chop spinach very fine and combine with eggs in a small bowl. Stir well until as smooth as possible.

2. Mound flour in the center of a large wooden board. Make a well in the center of the flour and add the egg/spinach mixture. Using a fork beat the eggs together and then begin to incorporate the flour, starting with the inner rim of the well. As you expand the well, keep pushing the flour up to retain the well shape (do not worry if it looks messy). When half of the flour is incorporated, the dough will begin to come together. Start kneading the dough, using primarily the palms of your hands. Once the dough is a cohesive mass, set the dough aside and scrape up and discard any dried bits of dough.


3. Lightly flour the board and continue kneading for 10 minutes, dusting the board with additional flour as necessary. The dough should be elastic and a little sticky. Wrap the dough in plastic wrap and allow to rest for 30 minutes at room temperature.

4. Divide the pasta dough into 8 portions. Roll each one out through the thinnest setting on a pasta machine and lay sheets on a lightly floured surface to dry to 10 minutes. Cut the pasta into 5 inch squares and cover with a damp kitchen towel.


5. Bring 6 quarts of water to a boil in a large pot and add 2 tbsp salt.  Set up an ice bath next to the stovetop and add the 2 tbsp EVOO. Drop pasta into boiling water (6 or 7 pieces at a time) and cook until tender, about 1 minute. Transfer to the ice bath to cool, then drain on kitchen towels laying the pasta flat.


Step 4: Assemble the troops!

1. Preheat the oven to 375 degrees F.

2. Assemble the lasagne in a 10x20 in pan (or two 9x13 pans): spread a layer of ragu over the bottom of the pan and sprinkle with Parmigiano, add a layer of pasta, a layer of besciamella, another layer of ragu, Parmigiano, and pasta. Repeat until all the ingredients are used up, finishing with a layer of pasta topped with besciamella and a sprinkling of Parmigiano.

3. Bake for 45 minutes, or until edges are browned and the sauces are bubbling. Let stand for 10 minutes before serving (if you can!).


ENJOY!!


We ended up putting one of the pans of lasagna into the freezer after we baked it. We hope to have some friends over to help us eat it in the near future :)


Reference:
Batali, M. (2005). Molto Italiano: 327 Simple Italian recipes to cook at home. New York, NY: Harper Collins Publishers Inc.

Sunday, October 2, 2011

Risotto with Acorn Squash

It's been a while since I've posted some recipes that we've tried, and I thought it was due! Here is a great risotto recipe for fall thanks to Mario Batali. Since we moved to Italy Josh has become the risotto master in our house and this was the lastest one we tried. It was good!! Risotto is a dish that has very mild flavors and it takes a while to build up an appreciation for the delicate flavors. Here is a delicious fall recipe that you should try!! We paired this with steamed fresh green beans (with garlic, salt and pepper added for steaming).

Risotto with Acorn Squash
(Risotto con Zucca)
  • serves 4 people
  • about 30-40 minutes total time
1/4 cup extra virgin olive oil
1 medium white onion, cut into 1/4 inch dice**
1 small acorn squash, peeled, seeded and cut into 1/4 inch dice
1 1/2 cups arborio rice
1/2 cup dry white wine
8 cups chicken stock, heated until hot
4 tablespoons unsalted butter
1/2 cup freshly grated parmigiano-reggiano (and more for serving)
salt and freshly ground black pepper

1. In a 10-12 inch pan, heat olive oil over medium heat until almost smoking. Add onion and squash, cook until the onion becomes translucent but not brown (about 8-10 mintues). Add the rice and stir with a wooden spoon until toasted and opaque- not brown (about 3-4 mintues).

2. Add the wine, then add a 4-6 ounce ladleful of stock and cook, stirring, until the liquid is absorbed. Continue stirring and adding the stock a ladleful at a time, waiting until the liquid is absorbed each time before adding more, until the rice is tender and creamy yet still al dente, about 18 minutes.

3. Remove the pan from the heat, add the butter and parmigiano and stir vigorously until well mixed, about 25 seconds. Season with salt and pepper. Divide into four warmed plates and serve immediately with extra parmigiano.

ENJOY!!


** I would recommend cutting back to half an onion and a little more squash if possible. The onion was a little overpowering for the delicate flavor of the squash.


Reference:
Batali, M. (2005). Molto Italiano: 327 Simple Italian recipes to cook at home. New York, NY: Harper Collins Publishers Inc.

Monday, June 20, 2011

Cannelloni


Here is another great recipe courtesy of Mario Batali. Josh and I made this one last night and it was delicious!! This cannelloni is a little sweeter than the ones I’ve had in the past, and had that little “something” that always seems to be missing when I make cannelloni. Mmmm… this one is definitely a keeper!! It is also not for the time conscious! This one takes a while to make, so be sure to save this for a weekend when you have time. But it is so worth it J
Time: 1 hour 20 prep, 30 minutes cook time
Serves: four

Cannelloni al Forno
Step 1: Make the Besciamella (20 minutes)
5 tablespoons unsalted butter
¼ cup all-purpose flour
3 cups whole milk
2 teaspoons salt
½ teaspoon freshly grated nutmeg

1.      In a medium saucepan, melt the butter over medium heat. Add the flour and stir until smooth. Cook, stirring constantly until it is light golden brown (6 to 7 minutes).
2.      At the same time, bring another medium saucepan with the milk almost to a boil. Add the milk to the golden brown mixture, constantly stirring in one cup at a time. Whisk the mixture until smooth and bring to a boil (constantly whisking- or else the mixture will burn). Cook, whisking, until thickened (about 10 minutes), then remove from heat. Season with the salt and nutmeg. Transfer to a bowl and let cool, then cover and refrigerate.
NOTE: the cannelloni only calls for one cup of this mixture, while the recipe makes a little more than 3 cups. We cut everything into one third and only made one cup of the besciamella.

Step 2: Make the basic tomato sauce (40 minutes)
¼ cup extra-virgin olive oil
1 Spanish onion, diced
4 cloves of garlic, thinly sliced
3 tablespoons freshly chopped thyme
½ medium carrot, finely shredded
Two 28 oz. cans whole tomatoes
Salt

1.      In a large saucepan, heat the olive oil over medium heat. Add the onion and garlic and cook until soft and light golden brown (8-10 minutes). Add the carrot and thyme and cook until the carrot is soft (about 5 minutes).
2.      Add the tomatoes with their juice and bring to a boil, stirring often. Lower heat and simmer until the sauce is as thick as hot cereal (about 30 minutes). Season with salt. This sauce can be refrigerated for up to one week, or frozen for six months.
NOTE: to save time, we used canned, plain tomato sauce, and added that to the vegetables, instead of canned whole tomatoes with the juice. This will save the 30 minutes needed to simmer the sauce. Only a few minutes on the stove and the sauce is ready.

Step 3: Now, we are ready to make the cannelloni!!
1 tablespoon unsalted butter
8 oz. ground pork
8 oz. ground veal
¾ cup freshly grated Parmigiano-Reggiano
1 tablespoon all-purpose flour
1 cup whole milk
1 large egg, beaten
Pinch of freshly grated nutmeg
Salt and freshly ground black pepper
Cannelloni noodles (we bought pre-made, but Mario gives the recipe in his book for homemade- I didn’t include that because of how long this recipe is)
1 cup basic tomato sauce
1 cup besciamella
1.      In a 10-12 inch sauté pan, heat 1 tablespoon butter over high heat until it foams and subsides. Add the ground pork and the ground veal, cook stirring occasionally and breaking up clumps of meat, until brown. Drain excess fat, then add ½ cups of the Parmigiano, the flour, and milk and bring to just under a boil. Reduce heat and simmer, cook for 10 minutes stirring frequently. Remove from heat and allow the filling to cool. Stir in the egg and season with the nutmeg, salt and pepper. Set aside
2.      Cook your noodles as instructed on the label. Use an ice bath to drop the noodles into after cooking- this will help to keep them from ripping when you stuff them with the meat mixture.
3.      Preheat the oven to 350°F.
4.      Spoon half the tomato sauce into the bottom of a large baking dish (9x13) in an even layer. (we used a little more than that)
5.      Fill the cannelloni noodles with the meat mixture, and line the bottom of the pan with the stuffed noodles. Top with the remaining tomato sauce and then the besciamella. Sprinkle with the remaining Parmigiano.
6.      Bake for 20-25 minutes until the sauces and cheese are bubbling and the edges of the pasta are crisp and browned. Serve immediately from baking dish.
Enjoy!!
This recipe seems complicated… but trust me, it’s worth it!! It was delicious J

Reference:
Batali, M. (2005). Molto Italiano: 327 Simple Italian recipes to cook at home. New York, NY: Harper Collins Publishers Inc.

Porcini Salad with Arugula

Insalata di Porcini. This salad has been a repeat in the Thielen household and is very easy to make. It’s simple, but with great flavor (as many Italian recipes are). Sometimes porcini mushrooms are difficult to find (even here at grocery stores in Italy), so I’ve used white agaricus bisporus mushrooms. This salad takes only a few minutes of prep time to clean the mushrooms, and only about 10 minutes cook time. This recipe comes from Mario Batali’s Molto Italiano cookbook.

Time: 15 minutes
Serves: four

Porcini Salad with Arugula

4 large fresh porcini mushrooms
2 bunches of arugula, washed and spun dry (about 3 loose cups)
½ cup extra-virgin olive oil
Grated zest and juice of 1 lemon
Salt and freshly ground black pepper
Freshly grated Parmigiano-Reggiano
Coarse sea salt (I leave this out)

1.      Preheat grill or broiler
2.      Carefully cut each mushroom in half and place them on the grill or on a baking sheet under the broiler. Cook, turning often until charred and softened (8-10 minutes).
3.      In a large bowl place the arugula, ¼ cup of the olive oil, the lemon zest and juice. Divide into four separate plates.
4.      Remove hot mushrooms from the grill (or broiler) and place on arugula. Shave the parmigiano on each salad and spoon the remaining olive oil over the salad. Sprinkle with sea salt and serve immediately.

*Some changes that I make: I mix the dressing on the side with the olive oil, zest, lemon juice and salt and pepper to taste. Then I toss the dressing with the arugula before adding the mushrooms. I also leave out the sea salt.

A great salad that will definitely be a repeat for us! Thanks to Mario Batali for sharing this one!


Reference:
Batali, M. (2005). Molto Italiano: 327 Simple Italian recipes to cook at home. New York, NY: Harper Collins Publishers Inc.